Posts

Showing posts from 2010

Poinsettia Wreath

Image
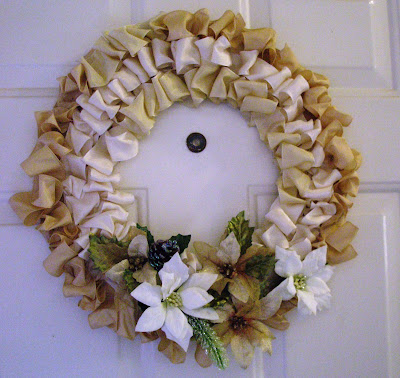
I have accumulated so much ribbon lately that I was looking for ways to use it to make some holiday decor.  I remembered how my grandmother used to make wreaths for every holiday and I used to sit down in her kitchen table and look at her beautiful creations.  I clearly remembered the Day of the Dead wreaths she made with crepe paper, wire, and ribbon.   In my nostalgia I thought about using my ribbon to decorate a wreath.  I had some cardboard left over and I drew a circle and cut it out to use it as the base.  Then I started scrunching up the wired ribbon all around. I used glue to keep it into place and mini brads on some parts, just to keep it in place but I took them away when it was dry. The poinsettias are from Michael's.  They have stems with 3-4 poinsettias for like $1.99.  I kept the palette soft and used white and gold poinsettias.  By the way, did you know poinsettias come from Mexico? Back in the 1800s the US Ambassador to Mexico introduced them to the Unite

Blog Givaway!!!

Image
It's the month to give thanks and I'm feeling thankful for all of you! I love making new friends from all over the world who share in this wonderful hooby (i.e. obsession...LOL).  So I'm having a blog givaway!!!  This is a picture of the cards I'm giving away.  It's a beautiful lot!!! All you have to do is leave me a comment about the cards and become a follower to be entered into the drawing using a random selection website. I'll have the drawing on November 30th, so that the lucky winner can have them in time for the holidays!  (Also, they didn't all fit in one picture, so the rest are pictured below...)  You all are wonderful and thanks so much for stopping by!!! TFL!!! Thanks Ann for your beautiful words and congrats on getting the cards!!!

Starry Night

Image
It is that time of the year to celebrate.  Me and my husband have a special date we celebrate and I created this card for him.  The painting by Vincent Van Gogh is one of our favorites and it also has special meaning for us.  So I had this idea of using the image but alter it to make it ours and reflect the meaning it has for us.  After several failed attempts, I created one that I was satisfied with. The first thing I did was find a picture of the painting.  I then used my ink cartridge printer to print it.  Immediately after it printed I spritzed with water all over until the paper was soaked but not too much that it would tear.  Right afterwards I applied the heat tool until the paper was dry on both sides.  The effect is a nice washed out print that retains the original elements in an altered form.   Once that was done I covered the image with a thick layer of Crackle Accents.  I applied the heat gun to get the corrugated texture and glossy finish.  The stars were fir

Beautiful Holiday Card Sets for sale on my ebay!

Image
I'm getting the Holiday spirit and it inspired me to create so many cards from my heart!  Card-making is such a relaxing craft! And now I have them for sale on my ebay!  I have them for sale in sets of a similar theme, and I have something for everyone, from minimalistic and fun to vintage and rustic.  Thanks for taking a peek! If you want to check out the listing you can click on my ebay widget on top of the page.    

Cardmaking Frenzie ~Snowflakes Collection

Image
Hi dear bloggers! As we put down the Halloween decorations and start getting those holiday stuff boxes out, I'm getting in a card making mood.  I'm a card-making machine!!! I try to keep them simple and not make them so complicated so that I can make several while still adding my own personal touch. This is the series where I use snowflakes in some shape or form.  I discovered that using Mod Podge and Diamond Dust gives the die cut snowflakes an amazing glossy and sparkly effect.  I used the Spellbinders Snowflake dies (I think there are like 3 sets but I used them interchangeably).      Tip : To make your own sugar glazed snowflakes use your die cutting machine and make sure you also use the embossing sandwich. Basically you cut first and then add an embossing mat in between the paper and the top cutting pad so that you can get the beautiful texture of the embossing.  Ink edges with your preferred ink and then when you have a batch, use a brush to add the mod podge.  While

Distressed Gardenia Tutorial

Image
Hi everyone! I was playing around with my zutter distrezz it all and trying to make a flower similar to the Prima Calcutta flower.  What you need:  Paper (preferably thick cardstock) glue Scissors or Cricut the zutter distrezz it all or distress tool Chalk ink  Flower stem centers (I bought the ones I use here at Hobby Lobby, they are usually in the bridal section). Here's a picture if you have no idea what I'm talking about, LOL! 1.  The first thing to do is to cut the petals.  I used my cricut Home Accents and cut 8 petals on each one of these dial measures: 2 3/4", 3", and 3 1/2".  If you don't have a cricut you can create your own petals in different sizes or create a stencil so all of your petals are similar in size. 2.  I used the zutter distrezz-it-all to create the grunged look on all the petals.  This look can also be achieved by using a distress tool like the Tonic Distress tool by Tim Holtz.  If you have neither you can use an xacto k

Chic Baby Girl Album

Image
This is an album I created for my younger cousin, who was born this year.  I used the Teresa Collins Chic Babe Girl Album kit.  I'm officially in love with Teresa Collins' kits, they just have everything you need and wish for to make a perfect coordinated and unboring album.   Here I made the big black flower with lace and poly satin fabric.  It's actually very easy, just sewed all the layers together.  I may be posting a tutorial, but can't promise anything... school is crazy hectic! I added scalloped lace details, and a lot of the titles are cutouts from the kit.  Some of the letters are accented with UTEE and black enamel accents from Inkessentials.    The papers are so gorgeous! This one has rulers all over, and I totally loved it, as it reflects how quickly little ones grow!!! Another cutout from the kit pps and added the crown ribbons, also in the kit.  The inking was done with Colorbox Ink in Black using a stencil from Crafter's workshop 6x6 orc